Installing The Battery Kit
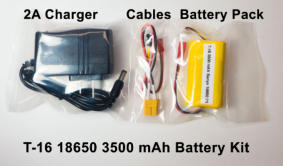
18650 3500 mAh kit shown
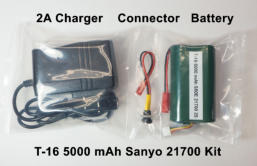
21700 5000 mAh kit
with optional XT-60 cable
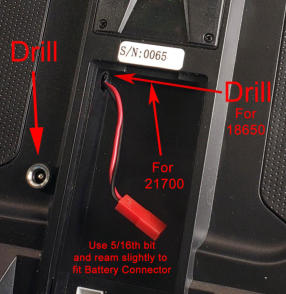
Installation is typically a five minute process. You will need a drill with a 5/16 bit to drill a hole in
the case and a second into the battery compartment. For the 21700 install, the hole in the
battery compartment may have to be reamed out slightly to allow the red JST connector on the
battery to pass into the case to make room for the larger battery.
Remove the back of the case. Removing the back takes about 30 seconds, Click here if you
need instructions. All work is done on the back, put the radio aside.
Drill the holes; into the top of the battery compartment for the 21700 and/or 18650 and upper
side of the compartment for the 18650 as in the photograph below. Remove the nut from the
coaxial power connector and pass the red connector into the top of the case. Put the nut back
on and tighten with an 11mm or 7/16th tool or pliers. Do not over tighten.
Feed the connector through the hole into the battery compartment and replace the back. Note
that the radio internal power connector and USB socket can be a bit fiddly when replacing the
back. Make sure it is aligned properly as it is loose.
Both batteries are inserted label down. Before inserting the
battery all the way, plug the balance connector into the
radio’s power socket and connect the red JST connectors.
Feed all excess wire into the case, especially with the 21700
pack. The 18650 will be a loose fit but the 21700 must be
pushed in firmly. Replace the door. The 21700 will be a bit
difficult to close. I usually press down on the door tab with a
small screwdriver so it will slide into the slot. There should be
no reason to remove the 21700 more than occasionally.
Plug in the charger and the green light will indicate it’s not
charging. Plug into the coaxial connector and the red light will
com on and remain lit until the pack has reached nominal
voltage of around 8.4V. The initial charge will take some time,
4 or 5 hours.
Enjoy!